...
This documentation describes which detailed information can be read out within a single telephone account on the STARFACE and which configuration options are available at this point.
Device Type:Here, In this drop-down menu you can see which predefined STARFACE device profiles were have been automatically selected for this telephone account. Via the list entry "new ..." a new device type can be created.
Functionality: In this drop-down menu you can configure what functionality this account should cover. The following options are available:
...
Password: The password should be selected so that it is as long and complicated as possible, and we recommend using a password generated using the button "Random Password button".
Emergency Call: If the telephone account is not operated in the same area code as STARFACE, another location must be selected here, because an emergency call is always connected to the respective location’s local area network and within its prefix range. Additional emergency call locations are created and configured in the line range.
...
- Autoprovisioning must be active on STARFACE.
- This function only takes effect when the device’s HTTP access is not protected by access data other than that specified by the system.
- The automatic configuration always only affects the first line of an a SIP telephone. If the telephone is already registered e.g. on another telephone system via this first line, this configuration is overwritten.
- If the existing SIP account is not on the first line of the SIP telephone, its settings are not changed by automatic overwriting. The account is also created on line 1. This can lead to problems, because the telephone will try to register on the server using both lines.
| Hinweis |
|---|
| Note: The setting is not saved permanently; rather, it but only affects this one configuration process. The field is active again by default the next time the configuration view is opened, the field is active again by default. |
In the tab "Extended Settings" the following options are available:
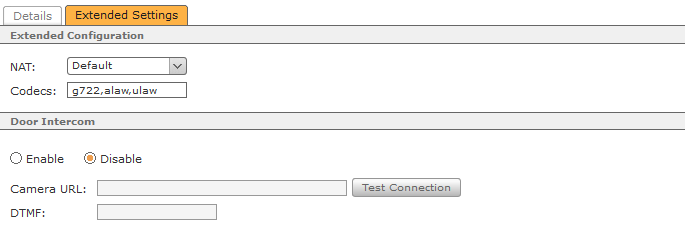
NAT: The Default setting means that the global STARFACE setting is adopted from the Network section (see also “Configuring the STARFACE Network Settings”). It is recommended to always use Default or Yes here, particularly if the telephone/terminal device is outside of the local network.
Codecs: A codec ensures the conversion of analog (voice) information to digital data and vice versa (encoding and decoding).
The G.711 codecs alaw and ulaw are used as default settings for most telephone models. The G.711 codecs have a good voice quality and a very short delay time of just 2 ms, but they require a (relatively) high bit rate of up to 84 kbit/s.
The broadband codec G.722 (≙ high-definition voice) offers a far higher voice quality than G.711 with its frequency range of 50 to 7000 Hz at a lower transmission rate (64 kbit/s). Many of the telephones supported by STARFACE also work with G.722.
It is possible to explicitly assign one or more codecs to a telephone account; several codecs are entered and separated by commas. For example:
g722,alaw,ulaw
But it should be ensured beforehand that the respective telephone model supports the codecs and that use of the codecs is activated on the telephone itself.
Generally speaking, STARFACE supports the use of the following codecs:
- alaw
- ulaw
- g722
- g726
- gsm
- h63
- h263p
Door Intercom: Here, information on whether the telephone account is a door intercom or not can be activated or deactivated.
Camera URL: If it is a door intercom with camera, the IP address and the file path for accessing the door camera’s image data can be stored here.
The camera image is displayed in the Callmanager of the STARFACE web interface and in the STARFACE UCC client. Some telephones (e.g. Gigaset PRO DE700 IP or Gigaset PRO DE900 IP) are also shared for use of a camera image.
Examples of camera URLs:
http://IP address of the door intercom/jpg/image.jpg for Baudisch
http://IP address of the camera enu/camera320x240.jpg for 2N EntryCom IP
| Hinweis |
|---|
| Note: When integrating a door intercom, please also always observe the manufacturer’s documentation. |
DTMF: The DTMF code for opening the door using the telephone keys is stored here. Additionally, in the Call Manager a link is assigned with the key code via which the door can be opened at the mere click of a mouse.
| Hinweis |
|---|
Note: The “Opening Doors using DTMF” functional feature can be used independently of the use of a door camera and also with door intercoms which do not have a camera. |
The button "Test Connection" button can be used to test the configuration for the door station.